This guide not necessarily only for Compact CQ40, it also may work on Laptop that doesnt have the setting for Harddisk in BIOS. What I mean is, we cant change the setting from AHCI to ATA in your BIOS setting page( This is done to make sure the Blue Screen doesnt come up when you try to install windows XP ). Thats why we need to slipstream the SATA HDD driver to the windows XP installation file so that the Blue Screen doesnt popup.
Requirement :
1) A copy of Windows XP SP2 ( If possible ) = Put it into a new folder on your desktop. (easy to browse and please dont use .iso or any type of image file)
2) A software called nLite.
3) Extracted SATA driver for windows XP.
*** XP Drivers for your Toshiba A205-S5831, Click HERE to download ***
*** If you dont know what type of SATA driver you need for your laptop, please read THIS ***
Follow the steps below :
1)
 | |
| Run nLite and click NEXT. |
2)
 |
| Browse for your Win XP SP2 folder and click NEXT |
3)
 |
| Ignore this page and click NEXT |
4)
 |
| Click on Drivers & Bootable ISO and click NEXT |
5)
 |
| Click "Insert" > "Single Driver" |
6)
 |
| Browse for the SATA Driver that you have extracted from the zip/rar file that you download earlier. Therere 2 of them. Choose 1 "iaahci.inf" and click OPEN. |
7)
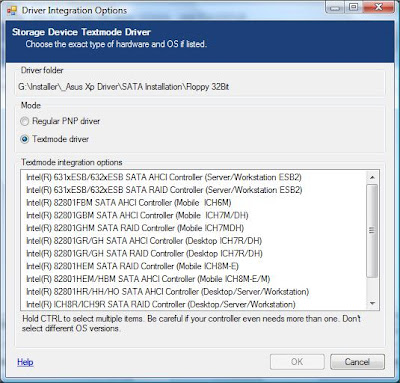 |
| Above windows will popup. Select "Textmode Driver" and highlight all of it by pressing CTRL + A and click OK. |
 |
| After you clicked the "OK" button, you will see above windows. Click NEXT. |
 |
| Click YES to start the process. |
 |
| Let the process finish and click NEXT. |
 | ||||
| Now, you can Burn to your empty Disk or Create an Image file. To Burn, just click "BURN" button. ***P/S : dont click NEXT in this windows *** |
 |
| Click YES to start. |
 |
| After the process of burning complete, Click NEXT and you will see the above windows. Click Finish to exit nLite. Now you can try to format your laptop. ***Note that different laptop may need different version of SATA HDD driver. If you choose the wrong driver, you will end up BLUE SCREEN. Good LUCK!!! |
Credits :
Black-x for the Correct SATA Driver
This images was taken from http://maxeasyguide.blogspot.com.
0 comments:
Post a Comment